The Add Schedule form is where you create the recurring or one-time shifts your team uses for employee assignments, schedule review, notifications, and downstream time-entry tracking.
Before you create a schedule, focus on two main decisions: who should be scheduled and how often the schedule should occur.
- Who will be scheduled?
- Individual Employee: use this when one known employee should work every occurrence in the schedule.
- Multiple Employees: use this when the assigned employees can vary across the days or occurrences in the schedule.
- Any Employee: use this when you need coverage for a headcount but do not yet know exactly who will work.
- How often should the schedule occur?
- Recurring: use this for a repeating pattern such as weekdays, weekly coverage, or monthly shifts.
- One Time: use this for a single dated shift, special event, or temporary coverage need.
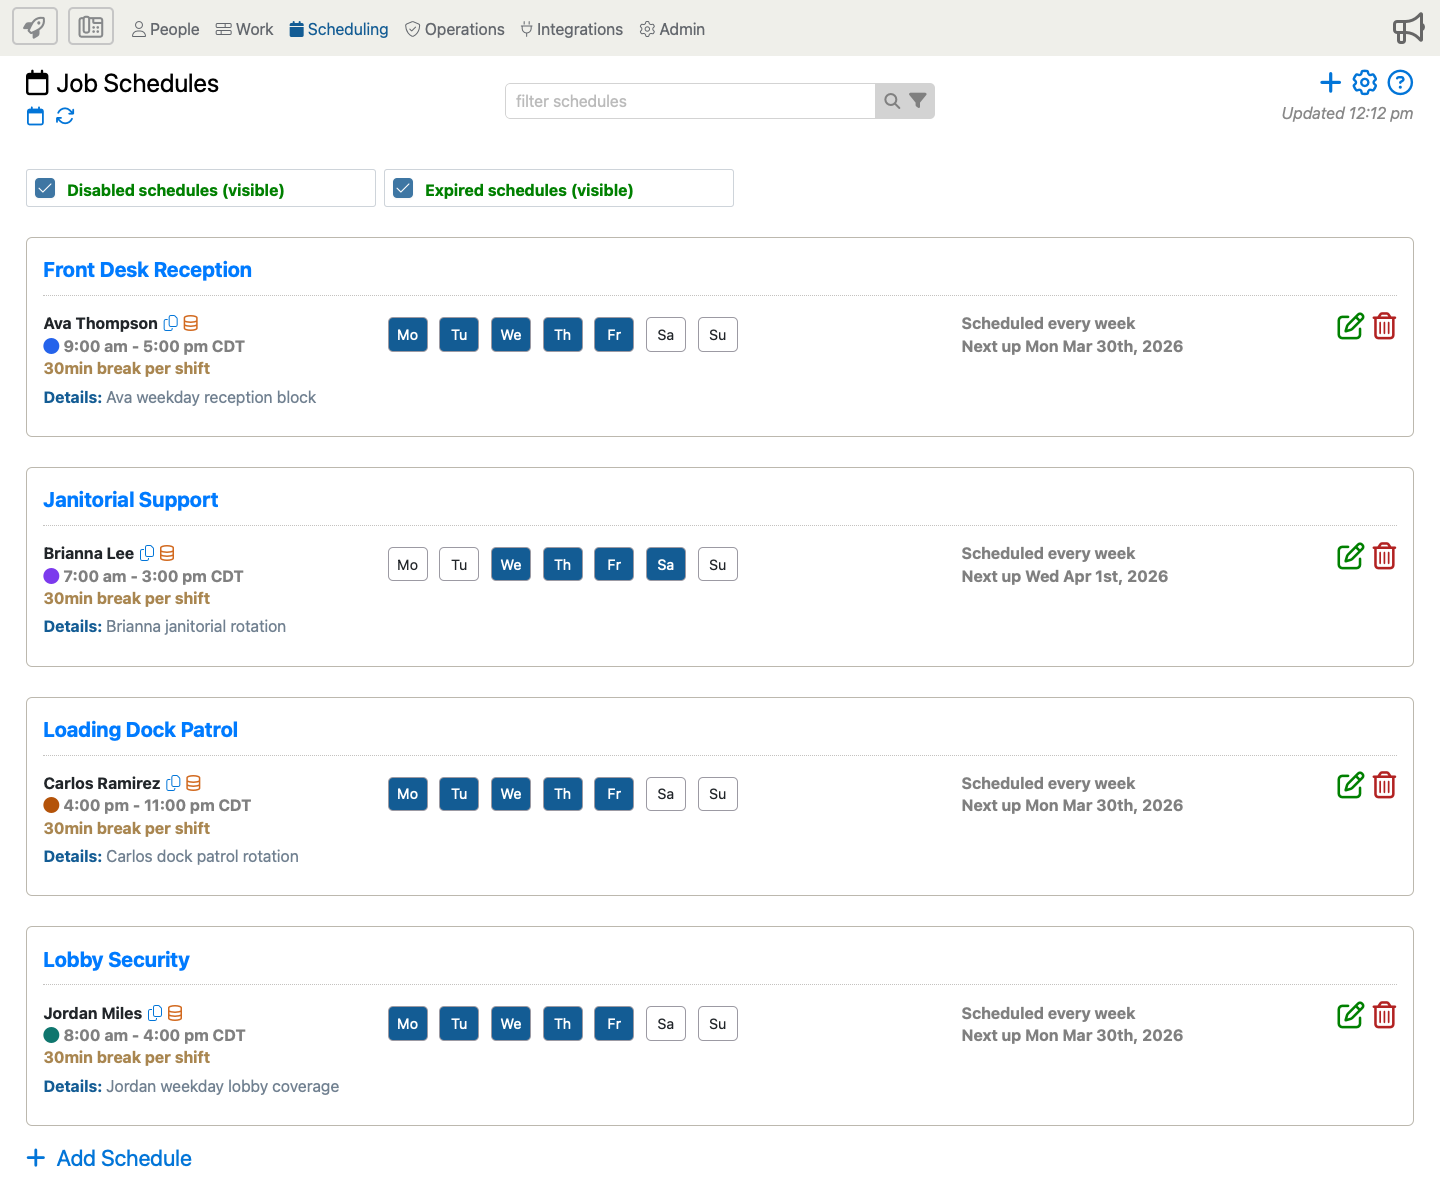
Start from Scheduling > Job Schedules. You can open Add Schedule from either the small blue plus icon ![]() in the upper-right page controls or the larger + Add Schedule button at the bottom of the schedules page.
in the upper-right page controls or the larger + Add Schedule button at the bottom of the schedules page.
When the Add Schedule form opens, review the full form below from top to bottom. Use the blue i markers to jump to details about the visible help topics, then read the matching explanations underneath.
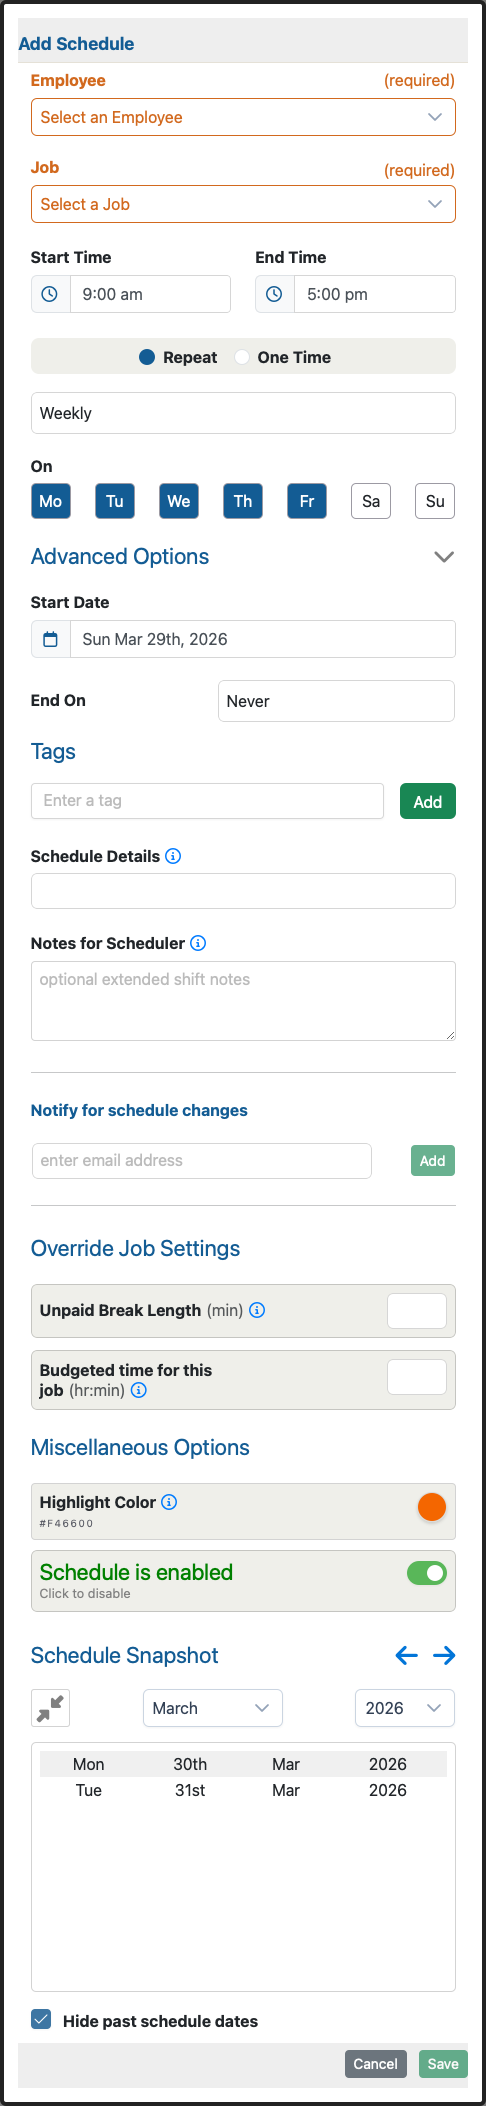
The form shown below includes many of the schedule options your company may use. Depending on how your company is set up, you may also see options for one-time schedules, any-employee scheduling, multi-employee coverage, pending approval, work orders, automatic check in and check out, paid holidays, or time-overage controls.
Option Descriptions
Who And What You Are Scheduling
Employee
Choose the employee who should work the shift. In some accounts, this section can also support Any Employee or multi-employee scheduling when the schedule is meant to cover staffing needs instead of one named person.
Job
Select the job or assignment the shift belongs to. This controls where the employee is scheduled to work and which job-level settings the schedule can inherit.
Schedule Type, Any Employee, And Multi-Employee Scheduling
Some companies can choose between one named employee, multiple named employees, or an Any Employee count. Use the named employee options when you know exactly who should work. Use the flexible options only when your scheduling process is built around open coverage or vendor-supplied staffing.
Shift Timing And Recurrence
Start Time And End Time
Use these fields to set the shift start and end time. For repeating schedules, these times apply to each scheduled occurrence unless someone later edits an individual shift separately.
Repeat Or One Time
Choose Repeat when the shift should keep recurring on a schedule pattern. Choose One Time when the shift should happen only once on a specific date.
Schedule Date
When One Time is selected, the form shows a single Schedule Date field instead of the repeat controls. Use it for one-day events, special coverage, holiday shifts, or other single occurrences.
Frequency
Use the frequency selector to decide how often the schedule repeats. Weekly, every other week, monthly, and yearly options let you match the recurring pattern to the way the shift actually repeats in the business.
On
Select the day buttons that should receive the recurring shift. These are the days the schedule will use when it creates upcoming occurrences.
Start Date
The start date is the first date the recurring schedule can begin generating shifts. Use it to control when the schedule should become active.
End On
Use Never for an open-ended schedule. Use End Date when the schedule should stop on a specific date, or Count Reached when it should stop after a certain number of occurrences.
Shift Notes And Communication
Tags
Tags help organize and search schedules later. Use them only when your company has a consistent way to group or filter schedules.
Schedule Details
Use Schedule Details for the short shift description that office staff may need to identify this schedule later. This can also appear in time-entry-related views and, in some accounts, can be exposed to employees during check-in.
Notes For Scheduler
Use this field for internal office notes that employees should not see. It is the right place for scheduling reminders, special handling notes, or internal coordination details.
Notify For Schedule Changes
Add the email addresses that should be notified when the schedule changes. This is useful when supervisors, coordinators, or clients need a change notice without watching the schedule page directly.
Work Orders
Some accounts also show an option to send a work order when the schedule is saved or approved. Use that only when your company actively relies on emailed work orders as part of the scheduling process.
Override Job Settings
Unpaid Break Length
This lets the schedule override the job’s usual unpaid break length for this shift pattern. Use it only when the scheduled shift should follow a different automatic unpaid-break rule than the job normally uses.
Auto-Apply Break / Minimum Time Before Break Deduction
Some accounts show a second break rule field that controls how long someone must work before the break should be deducted. Leave it blank when the break should always apply, or fill it in when the break should apply only after a minimum amount of worked time.
Budgeted Time For This Job
Use this when the shift should carry its own budgeted time target for reporting and overage review. A schedule-level budget can override the broader job-level budget for this recurring shift.
Time Overage
Some companies also expose a time-overage field. When available, it is used to track when an employee remains checked in longer than the allowed amount of time for the scheduled shift.
Miscellaneous Options
Highlight Color
Use the highlight color when your company color-codes schedules in scheduler views. Pick a color only if it helps staff recognize this shift pattern more quickly.
Schedule Is Enabled
Leave this on when the schedule should continue creating active occurrences. Turn it off when the schedule should remain saved but stop participating in normal scheduling activity.
Schedule Snapshot
The schedule snapshot lets you preview the upcoming occurrences before you save. Use it to confirm that your start date, recurrence pattern, and selected weekdays produce the shifts you expect.
Hide Past Schedule Dates
This option keeps the snapshot focused on future occurrences by hiding dates that have already passed.
Pending And Approved Schedule Status
Some companies can mark schedules as Pending and later Approved. Use that workflow only when your team intentionally stages schedules before they are ready to become active and trackable.
Auto Check In / Out
Some companies can let the system automatically create the time entry for the scheduled shift. Use this only when the shift should be system-managed instead of depending on the employee to clock in and out.
Paid Holiday
When paid holidays are enabled, the form can also show a holiday option that automatically creates the time entry for the selected employees instead of expecting a normal check-in and check-out.
Save The New Schedule
- Choose the employee or coverage type, job, and timing first.
- Use advanced override settings only when this schedule truly needs to differ from the normal job defaults.
- Review the schedule snapshot before saving so the generated occurrences match what you expect.